
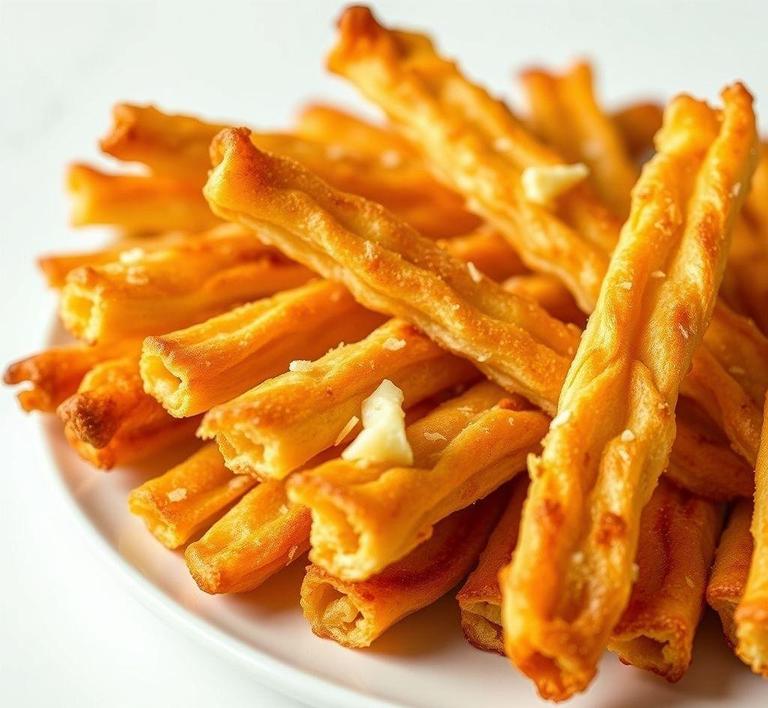
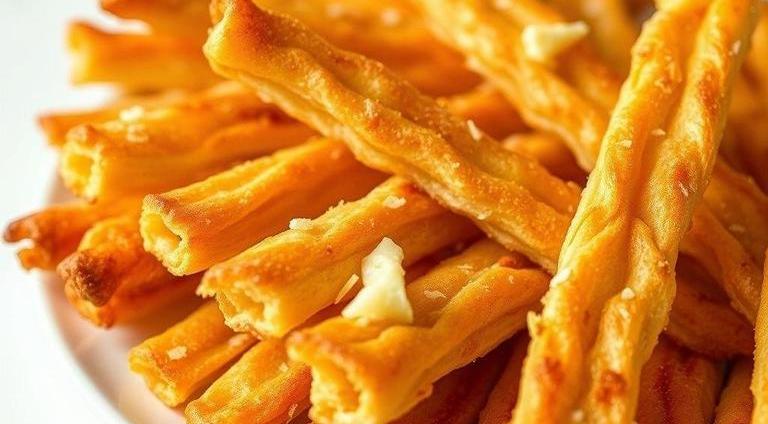
Jamie Oliver’s Cheese Straws Recipe
Jamie Oliver’s Cheese Straws are the ultimate blend of savory, buttery crispness and irresistible cheese flavor, making them the perfect snack for any occasion, from casual gatherings to elegant parties.
What Is Jamie Oliver’s Cheese Straws
Jamie Oliver’s Cheese Straws are a delightful, easy-to-make snack that combines flaky puff pastry with rich, sharp cheddar cheese. The recipe is simple yet packed with flavor, featuring a deliciously crispy texture that’s both satisfying and moreish. These cheese straws are a great addition to any appetizer spread or can even serve as a standalone treat for a cozy afternoon snack.
The beauty of Jamie Oliver’s Cheese Straws lies in their versatility. You can season them with additional ingredients like paprika, mustard powder, or even fresh herbs for a personalized touch. They’re also quick to prepare, making them a fantastic choice for when you need a crowd-pleasing snack without spending hours in the kitchen.
Jamie Oliver’s Cheese Straws Recipe
Ingredients Needed
To create these irresistible cheese straws, you will need the following ingredients:
- Puff pastry: This forms the base of the cheese straws, offering the perfect balance of buttery flakiness. You can use store-bought puff pastry for convenience or make your own if you’re up for the challenge.
- Cheddar cheese: A sharp, mature cheddar is ideal for these straws, as it melts beautifully and adds a rich, tangy flavor.
- Parmesan cheese: For an extra depth of flavor and some added saltiness, freshly grated Parmesan is an excellent complement to the cheddar.
- Egg yolk: This helps to brush the pastry before baking, giving the cheese straws a golden, glossy finish.
- Flour: A light dusting of flour is necessary to roll out the pastry without it sticking to the surface.
- Seasonings (optional): A pinch of mustard powder, cayenne pepper, or paprika can give your cheese straws a little extra zing, depending on your taste.
Equipment Needed
The following equipment will help you bring Jamie Oliver’s Cheese Straws to life:
- Baking tray: A large baking sheet lined with parchment paper to ensure the cheese straws bake evenly and don’t stick.
- Rolling pin: Used to roll out the puff pastry to the right thickness for perfect straws.
- Grater: For grating the cheddar and Parmesan cheese.
- Pastry brush: To apply the egg wash for a golden, crisp finish.
- Knife or pizza cutter: To slice the rolled-out pastry into strips.
- Oven: To bake the cheese straws until they are golden and crisp.
How To Make Jamie Oliver’s Cheese Straws?
Making Jamie Oliver’s Cheese Straws is surprisingly simple, and here’s a step-by-step guide:
- Preheat the oven: Start by preheating your oven to 200°C (400°F) and line a baking tray with parchment paper.
- Prepare the pastry: Roll out the puff pastry on a lightly floured surface. Roll it into a rectangular shape, about 1/8-inch thick. You want the pastry to be thin enough so it crisps up nicely, but thick enough to hold the cheese.
- Add the cheese: Grate the cheddar and Parmesan cheese and sprinkle it evenly over the surface of the pastry. You can also add your chosen seasonings at this point, like a dash of cayenne or a pinch of mustard powder for some extra zing.
- Cut the straws: Using a sharp knife or pizza cutter, slice the pastry into strips about 1 inch wide. You can also twist the strips to create a more decorative shape if you prefer.
- Brush with egg wash: Beat an egg yolk and lightly brush it over the surface of the pastry strips. This will give them a golden, glossy finish as they bake.
- Bake the straws: Arrange the cheese strips on the prepared baking tray, ensuring they’re not too crowded, and bake for 12-15 minutes or until golden and crispy. Keep an eye on them as they can brown quickly.
- Cool and serve: Once baked, remove the cheese straws from the oven and let them cool for a few minutes on the tray before transferring them to a wire rack to cool completely. Serve and enjoy!
Expert Tips
To ensure your cheese straws turn out perfectly, consider these expert tips:
- Use a mix of cheeses: While cheddar is a classic choice, feel free to experiment with other cheeses like Gruyère, Stilton, or even a bit of smoked cheese to add depth of flavor.
- Don’t overwork the dough: When rolling out the puff pastry, avoid overworking it, as this can make it tough and reduce the flakiness.
- Add some crunch: For an extra layer of texture, sprinkle some sesame seeds or poppy seeds on top before baking. This will also add a little nutty flavor that complements the cheese.
- Chill the pastry before cutting: If you’re finding the dough a bit soft and difficult to work with, pop it in the fridge for about 15 minutes to firm it up. This will make cutting and handling the pastry much easier.
- Perfect baking: Keep an eye on the cheese straws as they bake, as ovens vary. They should be golden brown and crispy, but not overly dark or burned.
Jamie Oliver’s Cheese Straws are a wonderfully simple yet delectable treat that combines crispy puff pastry with the savory, rich flavor of cheddar and Parmesan cheese. Whether you’re preparing them for a party, a family gathering, or just a quick snack to enjoy with a cup of tea, these cheesy bites are sure to impress.
With minimal ingredients, easy-to-follow steps, and the flexibility to customize to your taste, they are a fantastic addition to any recipe collection. So, get your puff pastry ready and experience the magic of homemade cheese straws-they’re crispy, cheesy, and utterly irresistible!.
Easy Recipe Variations For Jamie Oliver’s Cheese Straws
Jamie Oliver’s cheese straws are deliciously crunchy, savory, and perfect for any occasion. While the classic recipe is fantastic on its own, there are countless variations that can add even more flavor, texture, and fun. Let’s explore a few options that you can easily incorporate into the recipe to suit your taste or dietary preferences.
-
Herb-Infused Cheese Straws
Adding fresh or dried herbs to your cheese straws is a quick way to elevate their flavor. Try incorporating rosemary, thyme, or oregano into the dough. These herbs complement the sharpness of the cheese and add an aromatic touch. A sprinkle of crushed black pepper can further enhance the savory profile. -
Spicy Cheese Straws
For those who love a bit of heat, adding chili flakes or cayenne pepper to the dough will spice things up. You can even experiment with adding a small amount of ground paprika or smoked paprika to introduce a smoky undertone. If you prefer a bit of sweetness to balance the heat, consider using a touch of honey in the dough and pairing it with a spicy cheese like pepper jack. -
Cheese and Bacon Straws
A crispy, savory bacon addition takes these cheese straws to the next level. Finely chop or crumble cooked bacon and mix it into the dough for added crunch and depth. You can also use pancetta for a slightly different, more delicate flavor. This variation is ideal for parties or a casual get-together with friends. -
Vegan Cheese Straws
For a plant-based version, simply swap out the dairy cheese for a vegan cheese alternative. There are many excellent dairy-free cheeses on the market that mimic the sharp, creamy flavors of traditional cheese. To replace the butter, use a plant-based butter substitute or coconut oil. These changes ensure that vegans and those with lactose intolerance can still enjoy the crispy, cheesy goodness. -
Gluten-Free Cheese Straws
For those with gluten sensitivities, it’s easy to make a gluten-free version by replacing the all-purpose flour with a gluten-free flour blend. Be sure to check that the flour you choose has good binding properties, as gluten helps with the dough’s structure. Adding a teaspoon of xanthan gum can also help improve the texture and elasticity of the dough. -
Cheese Straws with a Twist: Parmesan and Black Olive
For a Mediterranean twist, use a combination of sharp Parmesan cheese and finely chopped black olives. This creates a tangy, salty snack that’s perfect for wine pairings. The olives introduce a briny contrast to the creamy cheese, making each bite an exciting flavor experience. -
Cheese Straws with Sun-Dried Tomatoes
Another great Mediterranean-inspired variation is to incorporate finely chopped sun-dried tomatoes into the dough. These tomatoes add a sweet, tangy depth of flavor that pairs beautifully with the cheese. For an extra richness, you can also include a little bit of pesto in the dough.
Best Practices To Store Leftovers
When making cheese straws, it’s likely that you’ll have some leftovers. These tasty treats don’t last forever, so storing them correctly is key to maintaining their flavor and crunch. Here are some tips to help you preserve your cheese straws:
-
Room Temperature Storage
If you plan on consuming your cheese straws within a day or two, storing them at room temperature is ideal. Simply place them in an airtight container or a resealable plastic bag. Ensure that the container is sealed tightly to prevent air from making the straws soft. Store the container in a cool, dry place, away from direct sunlight and heat. -
Refrigeration for Longer Shelf Life
If you need to store them for a few days longer, consider placing your cheese straws in the refrigerator. While refrigeration can slightly affect their crispiness, the cool environment will keep them fresh for up to a week. Make sure they’re in an airtight container to prevent moisture from softening them. -
Freezing for Future Enjoyment
For the longest storage, freezing is a great option. To freeze cheese straws, arrange them in a single layer on a baking sheet and place them in the freezer for about an hour. Once they are frozen solid, transfer them to a freezer-safe bag or container. When you’re ready to enjoy them, simply bake them in a preheated oven at a low temperature (around 150°C or 300°F) for 5-10 minutes to crisp them back up. -
Reheating Leftovers
To maintain the cheese straws’ crispness after refrigeration or freezing, it’s best to reheat them in an oven. Place the straws on a baking sheet and heat them at 180°C (350°F) for about 5-7 minutes. Alternatively, a toaster oven works wonders for reheating small batches without compromising texture.
What Goes Well With Cheese Straws?
Cheese straws are versatile snacks that can pair with a variety of drinks and dishes, making them perfect for any occasion. Here are some delicious combinations that complement the cheesy, savory nature of these baked treats:
-
Wine Pairings
- White Wine: A crisp white wine like Sauvignon Blanc or Chardonnay pairs wonderfully with cheese straws. The acidity and fresh flavors of white wine balance the richness of the cheese, creating a delightful contrast.
- Red Wine: For those who prefer red wine, opt for something light and fruity, such as a Pinot Noir or a Beaujolais. These wines will enhance the flavors of the cheese without overwhelming them.
- Sparkling Wine: If you’re serving cheese straws as an appetizer for a celebration or gathering, a glass of Champagne or Prosecco makes an elegant pairing. The effervescence helps cleanse the palate between bites.
-
Dip Pairings
- Tomato Salsa: A zesty, fresh tomato salsa complements the richness of the cheese straws. The acidity of the tomatoes and the spices in the salsa create a vibrant contrast to the crispy, cheesy snack.
- Cream Cheese Dip: A creamy, smooth dip made from cream cheese and a few seasonings (such as garlic or herbs) offers a luscious texture that enhances the crunch of the straws. You can even mix in some finely chopped chives or parsley for added flavor.
- Pesto: For a more Mediterranean flair, pair cheese straws with a vibrant basil pesto dip. The herbal, nutty, and garlicky notes of pesto elevate the flavors of the straws and add an extra layer of taste.
-
Other Snack Pairings
- Charcuterie Board: Cheese straws are an excellent addition to a charcuterie platter, where they can be paired with an assortment of cured meats, cheeses, olives, and pickles.
- Salads: Add some crunch to your salads by sprinkling crumbled cheese straws over the top. They make a delightful substitute for croutons, adding both flavor and texture.
-
Cocktail Pairings
- Martinis: The dryness of a gin martini or a vodka martini makes for a refined pairing with cheese straws. The subtle botanical flavors of the gin pair beautifully with the savory crunch of the straws.
- Aperol Spritz: If you’re looking for a lighter, more refreshing cocktail, an Aperol Spritz is the perfect match. The citrus and herbal flavors of the drink complement the cheese’s richness and create a balanced, satisfying snack.
Conclusion
Jamie Oliver’s cheese straws are an irresistibly tasty snack, and with a few simple variations, you can customize them to suit any occasion or dietary need. Whether you’re making herbed, spicy, or even vegan-friendly cheese straws, these crispy treats can easily be adapted to fit your preferences.
Proper storage ensures you can enjoy them for days, and their versatility makes them ideal for pairing with wines, dips, and other snacks. Whether you’re hosting a party or enjoying a casual afternoon snack, cheese straws are a delightful addition to any table.
FAQs
What Are The Main Ingredients For Jamie Oliver’s Cheese Straws Recipe?
The main ingredients for Jamie Oliver’s cheese straws include puff pastry, cheddar cheese, Dijon mustard, egg yolk, and some seasoning (like black pepper and cayenne pepper).
Can I Make Jamie Oliver’s Cheese Straws With A Different Type Of Cheese?
Yes, you can experiment with different cheeses. While sharp cheddar is the classic choice, you can substitute it with Gruyère, Parmesan, or even a mix of cheeses to suit your taste.
How Do I Prevent My Cheese Straws From Becoming Soggy?
To prevent sogginess, ensure the puff pastry is kept cold until you’re ready to bake. Also, be sure to bake the cheese straws until they are golden and crispy, as undercooking them can lead to sogginess.
Can I Use Store-bought Puff Pastry For Jamie Oliver’s Cheese Straws?
Yes, you can use store-bought puff pastry to save time. Just make sure to roll it out to the right thickness as per the recipe instructions.
What Is The Best Way To Store Leftover Cheese Straws?
Store leftover cheese straws in an airtight container at room temperature for up to two days. If you need to store them longer, you can freeze them for up to a month.
Can I Make Jamie Oliver’s Cheese Straws Ahead Of Time?
Yes, you can prepare the cheese straws up to the point of baking, then cover them with plastic wrap and refrigerate them for a few hours before baking. You can also freeze them and bake them directly from the freezer.
How Do I Make The Cheese Straws More Flavorful?
You can enhance the flavor of your cheese straws by adding herbs such as rosemary, thyme, or paprika. A sprinkle of sea salt on top before baking will also add a nice touch.
What Temperature Should I Bake The Cheese Straws At?
Bake Jamie Oliver’s cheese straws at 200°C (400°F) for about 10-12 minutes, or until they are golden brown and crispy.
Can I Make These Cheese Straws Gluten-free?
Yes, you can use gluten-free puff pastry as a substitute to make Jamie Oliver’s cheese straws gluten-free. Just ensure all other ingredients are also gluten-free.
How Long Do I Bake Jamie Oliver’s Cheese Straws For?
Jamie Oliver’s cheese straws typically bake for 10-12 minutes at 200°C (400°F), or until they are golden brown and crispy. Be sure to check them to avoid overbaking.